More pictures later but it sort of looks cool as the logos of the lumber comes through the liner. By total fluke the logos have blue lines roughly lining up with the blue line and centre ice on one side!
|
After last year's feeble attempt at a rink, I decided to try harder this year. At the end of last season I picked up a proper rink liner (40ftx50ft) on clearance at HD for $40. It was regularly $200+. This year I have been collecting waste wood for the boards. I also had a dozen wooden spikes from a previous project. First I connected the waste boards for a rough square of 16x32. Spiked them in. I then laid a base of waste lumber tarps. Finally I put half of my proper liner down (roughly 20x50) I may use the other half for next years rink. I used plastic clamps I had bought years ago to clamp the liner and base to the boards. I'll be adding flex pipe insulator or pool noodles for the board tops later. I am filling it a half hour on, half hour off tonight. Each inch is at least an hour on my pump. The next 14 days are supposed to be below zero, so now I wait and see. More pictures later but it sort of looks cool as the logos of the lumber comes through the liner. By total fluke the logos have blue lines roughly lining up with the blue line and centre ice on one side!
0 Comments
Only two bedrooms and the small hallway upstairs were left carpeted and I was planning to put hardwood in. I had been planing to make my own pine flooring for Annika's room. I stumbled upon some birch hardwood at Lowe's in the clearance section for about 1.50 sq/ft so my plans changed. I do like installing hardwood, having mostly maple and some pine flooring elsewhere in the house. All lovingly installed by me. I don't use rosin paper, however I glue and nail. I try to nail primarily to the joists and I plan every row for the least possible waste. For this job other than cutting around doorways I did not need to do a single cut. The trick is to organize all stock and first use pieces of wood that have multiples of similar lengths. Cant help it, it's the engineer in me. I also do the "racking" technique where possible. In the end I am very happy with the floor. The colour is actually just right. It is darker than I normally would do, as I would take natural wood and just lightly varathane it. Now just one room with carpeting left. I am still hoping to floor it with home made pallet Douglas fir, unless I run into another deal!
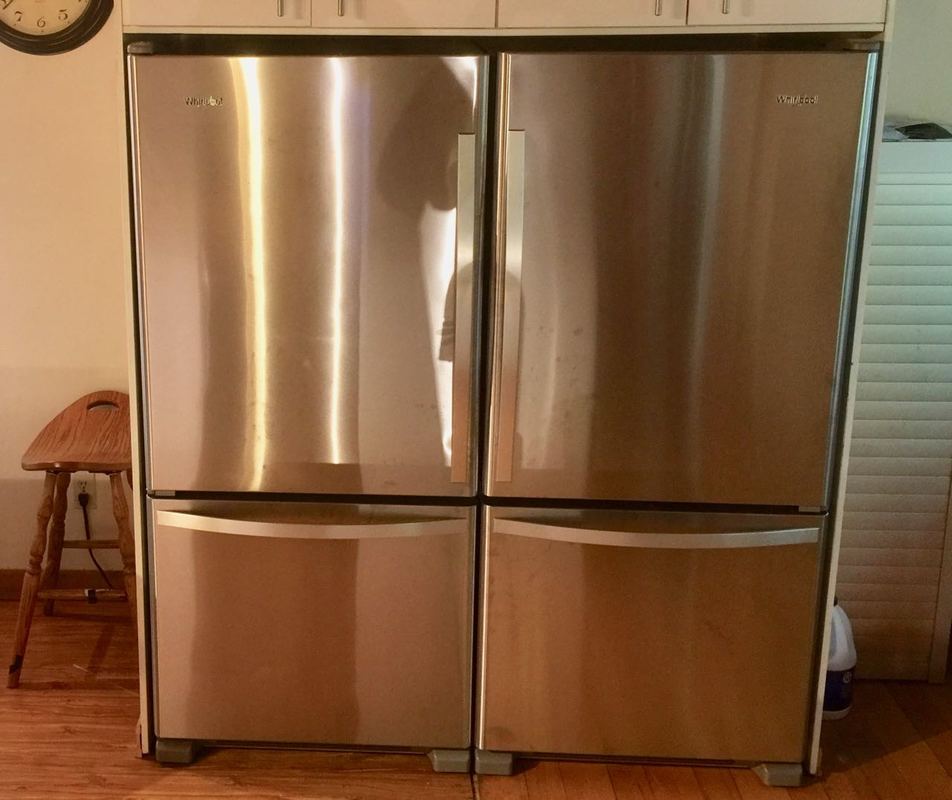
Double/Dual side by side fridge freezer  When my kitchen was last renovated, I removed a wall, changed all cabinets, redid the floor and added twin Frigidaire Gallery all-fridge and all freezer. I really liked it but the freezer broke down and since they no longer made that unit I couldn't get a new one. As such my all-fridge in the kitchen was no longer useful without a freezer. So instead I bought a large Bosch fridge freezer and threw the others in my garage. The Bosch was nothing special. Sure enough, the ice maker, which took up 1/4 of the freezer broke within months. The produce drawers, all made of cheap plastic, broke within days of the end of the warranty. More wasted space. They could not be fixed. I hacked the drawers to work another 3 months. A "large" fridge and freezer may work for some, but certainly did not WORK for our family. We were about to buy the new matching Frigidaire Professionals (or the Electrolux copy) when I discovered a simpler option. Some bottom freezer fridges can be bought in both right or left openings. Some of which are different models with openings set in factory not just a handle switch using factory door cutouts. Mind the difference as you may not want two little circles (cutouts) on the doors and non-symmetrical labels. The Whirlpool models (WRB329RFBM and WRB329LFBM) were a good choice. Maytag also may have a pair available (probably made in the same factory). Advantages of a dual fridges versus all-fridge/all-freezer include:
I decided to enclose it in a home made cabinet. I wanted a built in look. I needed to match the existed Ikea kitchen I put in in my last renovation. They did not have a deep double fridge cabinet of course. Luckily I found 3 large fridge cover panels (36x96) for $20 each and one deep cabinet ($10) in Ikea as-is. In the end all I needed to buy was one more cabinet, four cheap doors and four sets of hinges. I cut the panels down to 30" using Lowe's big wall saw - easier than my table saw. Normally I would mount the cabinets on the wall directly, but the cabinets were 24" deep and the fridges 30". Thus I needed a self supporting setup. I put an additional top shelf 30" deep above the Ikea cabinets and screwed that above a 2x2 which in turn was screwed into wall studs. It strengthen the whole structure right up. For the curious the opening is approximately w61" x h67". I am happy with the end result. I will be adding one more piece of trim work below the cabinets to enclose it a little bit further. The fridges may be tied together with a home made plate using the door holes on top of the fridge, however I may just "strap" them together using straping ribbon for now. Shout out to Lyle for coming over for "ten minutes", helping me pop up the cabinet and then pulling apart my old fridge in short order so we could get its out of the kitchen!!
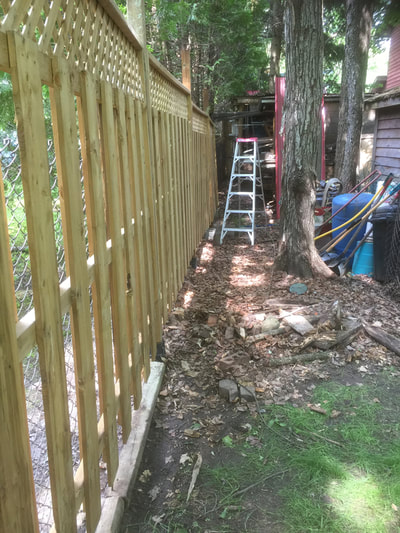
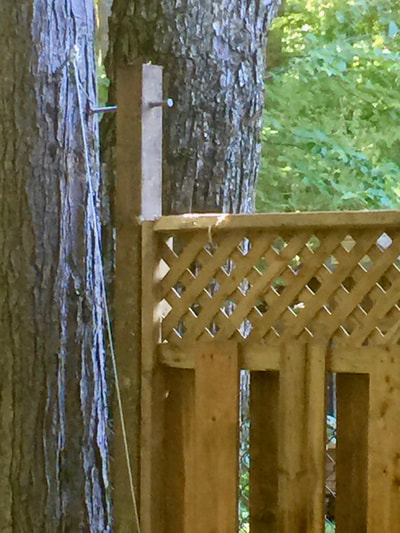
The side of the house has always looked pretty crappy as it has crumbling parging over styrofoam. This year I decided on a good solution, Novik "faux" stone. The novik goes on easy and really looks like real stone. I started on the worst side of the house. Need to rip some 1" cedar strips for the upper trim but I am very very happy with it. I need to stain (paint) the siding soon, maybe next year. My basement door had a river stone surface. It was OK but every year it was difficult to keep clean, especially due to the leaves clogging and mixing with the stones. I had thought about using those square connecting wooden exterior patio pieces, when I realized I had enough left over decking from when I previously converted my main deck to composite. In the end I used only wood from pieces I had lying around. It is essential a small 5x6 deck using 2x4's on "deck blocks". On fathers day, I installed 40 feet of shadow box with lattice top fence panels. Five panels that is. Took around 5 hours or an hour a panel. Kids played and "helped". Started at a tree and bolted the first panel to the tree. Solidifies the fence but shouldn't negatively impact the fence, even with tree growth.
Getting closer to finishing. Just painting and landscaping left. Was going to build a ramp from PT when I saw the spare pallet. It may not last as long but it is free and solid. All I needed to do was dig one end a little and trim the other with a circular saw. Voila instant ramp. I do like pallets. I also added a second widow that I had lying around. So far put in my tractor, my Finnish snow tires (Haki's) and snow blower. I have since added a single circuit breaker panel with two indoor electricity outlets (one on each wall), a roof LED work light, an outside outlet and a security light. It was lightly raining (again). I installed the shed deck any way. Used 2 culled 4x4 PT posts and one 2x4x12 PT for the frame. Used some leftover stone blocks (same as under the shed) instead of deck blocks. Used clearance 2x4x8 PT green for the decking. Yes green it was on clearance because no-one buys green anymore, just brown or grey. Probably spent $40 in total on the deck. I do like the looks of the deck. I'll stain it brown later this summer. I also need to paint the trim white sometime soon and add electricity. Oh yea I also need to add a ramp or slope the land on the right side. Haven't decided yet. I noticed the rain kicked up dirt on all sides of the shed so I will need to trim all around the shed with gravel. That'll have to wait till I order some more gravel for my trailer parking pad/skating rink on the other side of the lot, later this summer. Last day of shed build. Another hot and humid day. Put in window, door, did all final trim and misc. Re-squared the walls and nailed down everything I didn't before. I haven't shingled in years but it went well. Started working on the deck. Yes the shed will have it's own 4x12 deck. Deck will be done on my next day off. I'll also paint the trim white sometime this summer. More pictures will follow. Day two. Hot humid weather but finally had a free day. After organizing tools first job was building the trusses. Some trim work followed. Building and installation of the shelves and work bench. Next the roofing was installed. I bought 5 bundles of IKO marathon "cedarwood" shingles. They go on on the final day. I did expect to be finished today but the roof was finicky, and there was a lot of little tricky trim bits. I also had to play with my new dewalt multi-tool, pretty cool. |
AuthorJust a blog about what we and the kids are up to. Also some projects that I may be doing. Archives
July 2018
Categories
All
|


 RSS Feed
