• Jeff Bayly Blog and Projects Page
  • Antenna Tower
  • Roof Ethernet
  • Making a single cut yagi antenna (channel 21)
  • Pallet Flooring
  • 1969 TRIPLE-E REBUILD
  • Kids Playstructure
  • Pallet walkway
  • Pergola
  • Pallet Fence
  • Wall Office - Ikea Hack
  • About/Contact
  • Jeff Bayly Blog and Projects Page
  • Antenna Tower
  • Roof Ethernet
  • Making a single cut yagi antenna (channel 21)
  • Pallet Flooring
  • 1969 TRIPLE-E REBUILD
  • Kids Playstructure
  • Pallet walkway
  • Pergola
  • Pallet Fence
  • Wall Office - Ikea Hack
  • About/Contact
   

Jeff Bayly Blog & Projects

Wifi remote capture (Tethering) on canon rebel - part2

4/28/2016

0 Comments

 
Picture
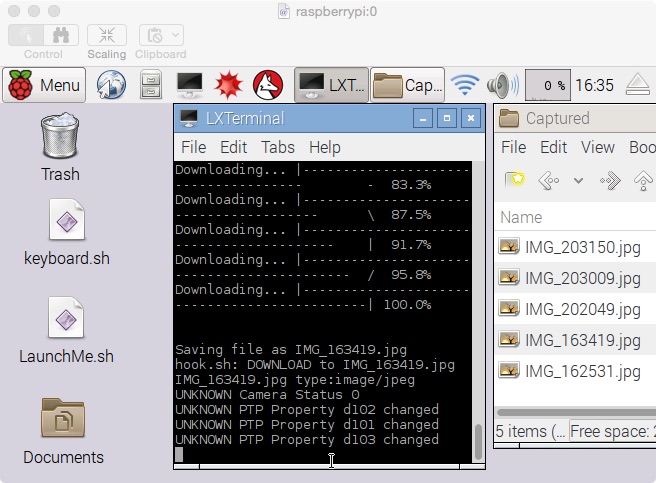
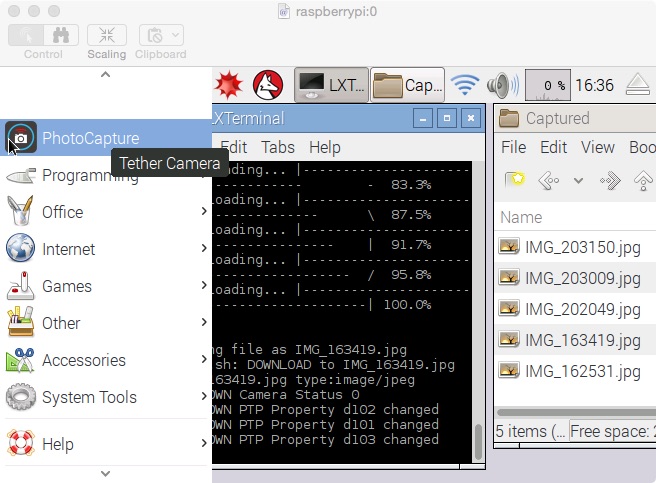
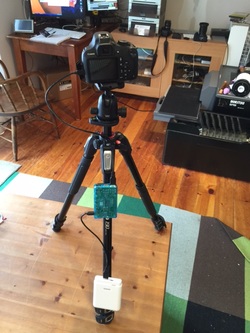
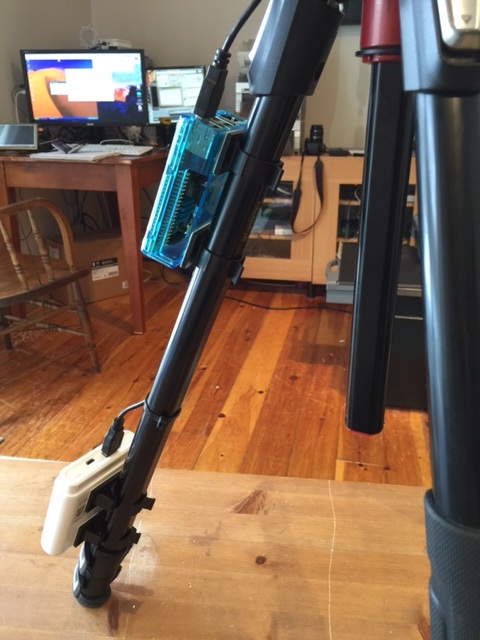
I have since added a 480x320 touch screen to my setup. When powered by a 10000 mah battery band it lasts over 12 hours, even with the screen always on. So it should suffice for my longest typical event shoot of 12 hours.

The screen is handy to quickly see if the pictures are being uploaded. I also allows you to start the capture program without VNC. My original plan was to mount the raspberry in a grip but until I find a suitable grip, this is not so bad!
I found a cheap bg-e8 battery grip  to try to mount the raspberry inside the grip. However it will NOT fit. In addition, the grip is good for the t3i, t4i, t5i but not the t6i. Currently I have only t3s, t4s, t5s and a t6i. Great. I may try again with a bg-e10 (t3, t4, t5) or even a bg-18 (for the t6i) , if I can find a cheap or broken one. Really all I need is a grip that will mount and which is large enough to enclose the raspberry. However ideally I would like to use it as a grip if it is too small for the pi 3.
The whole setup was only about $80 can. $50 for the pi3 (Active), $10 for the 32gb micro sd (canadacomputers) and $20 for the touch screen and case (free delivery from china in 2 wks). 
0 Comments

Wifi Remote capture with canon t3/t5/t6 and raspberry pi 3

4/10/2016

0 Comments

 
In some event photography events the camera is required more than 3m from a mac. 3m is the maximum allowed by USB, so I sometimes use USB extenders. In my last Les Promenades Gatineau job, I required 4 USB extenders. It worked, but it may have also damaged the circuitry of two cameras, so I needed another solution. Wifi adapters for the rebel series are not available or ridiculously expensive. The built-in wifi on the T6 is useless for tethering to a server/computer. The other obvious solution is using a eyefi card. I have had this solution in my back pocket for years and revisit it occasionally, but every time I find the uploads to be much too slow. My delivery system requires it to be on the server quickly so my Mac app can format everything and make it available for the iPad app (for customer presentation) as soon as possible.
 I'll try to avoid a long winded explanation, to make a long story short:
get latest raspbian, and install or turn on: gphoto2,samba,vlc,vnc,afp.

​gphoto2 is a UNIX app that works on almost all SLRs.
To install gphoto2 download and run this script:

https://github.com/gonzalo/gphoto2-updater/
using gphoto2:
http://www.gphoto.org/doc/manual/using-gphoto2.html
Installing afp and vnc from this great page:
http://dennistt.net/2013/09/15/raspberry-pi/

I originally wrote a perl script using gphoto2 to look and grab the new pictures every second until I saw that gphoto2 has a one line command to set the camera to automatically upload new pictures as they are taken! 
gphoto2 --capture-tethered

Write the following script:
CapturePhoto.sh

#!/bin/bash
cd /home/pi/Pictures/Captured
gphoto2 --set-config iso=200
gphoto2 --set-config aperture=9
gphoto2 --set-config shutterspeed=1/125
gphoto2 --capture-tethered --filename IMG_%H%M%S-%01n.%C


Or you can also do it without the hook and the setting of camera presets
#!/bin/bash
cd /home/pi/Pictures/Captured
gphoto2 --capture-tethered --filename IMG_%H%M%S-%01n.%C


There may be times when the script may request a override of the image because the camera has been turned on & off and a similar named file exists in your folder, so setting the image name based on the time is useful. A sequence number is also required if more than one image is taken within a second.

A excellent page showing other things you can do including some hook software by changing this line: gphoto2 --capture-tethered --hook-script=/home/pi/Pictures/hook.sh --filename IMG_%H%M%S.%C
http://www.giric.com/2013/03/tethered-shooting-with-gphoto2/

The capture tethered command will actually put the rebels in a mode where any picture taken will automatically upload it to the raspberry (on /home/pi/Pictures/Captured). My Mac app I previously wrote then takes it off the raspberry server wirelessly (and deletes it on the raspberry) and prepares it for my iPad selection app and the printer. I could mount the mac server and deposit the picture there however experience tells me it is better to deposit it locally and have my program grab it.

When the camera is turned off the script automatically closes.so you will need to restart the script or raspberry (if in autostart) every battery change. Remember there is a free Mac and Windows app from canon to tether and capture pictures but you can't strap a PC to the back of a camera!

My biggest issue was creating a desktop shell script which would open a terminal and run all the ghoto2 shell commands and then keep the terminal open. lxterminal is a bit 
weird about that.

Write this script for desktop/launch
​LaunchMe.sh

#!/bin/bash
lxterminal -l -e 'echo PhotoCapture ; /home/pi/Pictures/PhotoCapture.sh '

It automatically closes the script when you turn off the camera. Remember that you need to turn on the camera before you start your script (or raspberry if you have the script autostart).

In the pictures below I added it to the start menu, in addition to the desktop.
Picture
Picture
Picture
So I now have a wifi canon rebel adapter using the raspberry. I took this picture remotely which was automatically sent from the canon T5 (also works on my T3 &T6i) to the raspberry then wirelessly to a Mac. Programming with two kids jumping on you is not easy! The tethered speed is so much faster the eyefi card and seems to be as quick as the mac canon camera utilities for hardwired USB setups.
Here is my first attempt at productizing it. I have it powered by a 10000mah power bank (ADATA) below. In my first test, it seemed to have powered the raspberry pi 3 for an incredible 30 hours. I have set up a ping of my router every minute and will test it again when the current test runs out. I will also test it will a 3.5 touch screen. In real usage it will probably be just plugged in and the battery pack removed. Edit-2nd test with the pinging lasted 28 hours. Also it takes about 12 hours to fully charge the battery.

The raspberry is strapped to the tripod with a adhesive cable clamps in this first iteration.

I am in the process of sourcing a cheap canon grip so I can tear it apart and try to mount the raspberry inside a grip on the camera as this guy did:
​http://www.davidhunt.ie/raspberry-pi-in-a-dslr-camera/
Picture
Picture

Command Summary

Start with raspbian image

Write to sd card with win32imager program (mac on available also but i used windows 10 on parallels)

Expand your file size. Reboot. 


Set up localisation in configuration - keyboard, time zone etc. 
I found this to be very buggy affecting startup or wifi. It seems changes to the config file has some know bugs, so I just only change the keyboard and the time zone. Weird things were happening otherwise. Reboot
​

Connect to your wifi or ethernet. 

Install gphoto2
$ wget https://raw.githubusercontent.com/gonzalo/gphoto2-updater/master/gphoto2-updater.sh && chmod +x gphoto2-updater.sh && sudo ./gphoto2-updater.sh

$ sudo apt-get install libpopt-dev -y
$ sudo apt-get install libltdl-dev -y
$ sudo apt-get install libusb-dev -y
$ sudo apt-get install libusb-1.0-0-dev -y

$ cd libgphoto2-2.5.10
$  ./configure –prefix=/usr
$  ./configure
$ make
$ history
$ sudo make install
  
$ cd tar zvxf gphoto2-2.5.5.tar.gz
$ tar zvxf gphoto2-2.5.5.tar.gz
$ ./configure –prefix=/usr
$ ./configure
$ make
$ sudo make install

set up vnc & AFP
$ sudo apt-get install netatalk x11vnc
$ sudo apt-get update
$ x11vnc -storepasswd
$ 
sudo mkdir ~/.config/autostart
$ sudo nano ~/.config/autostart/x11vnc.desktop
--------
[Desktop Entry]
Encoding=UTF-8
Type=Application
Name=X11VNC
Comment=
Exec=x11vnc -forever -usepw -display :0 -
ultrafilexfer
StartupNotify=false
Terminal=false
Hidden=false
----------

sudo nano /etc/avahi/services/rfb.service
​----------
​<?xml version="1.0" standalone='no'?> <!DOCTYPE service-group SYSTEM "avahi-service.dtd">
<service-group>
  <name replace-wildcards="yes">%h</name>        
  <service>
    <type>_rfb._tcp</type>
    <port>5900</port>
  </service>
</service-group>
-----------
​restart sevice
sudo /etc/init.d/avahi-daemon restart

​
reboot

Some Gphoto2 commands

​   74  gphoto2 --capture-image-and-download
   75  gphoto2 --list-ports
   76  gphoto2 --auto-detect
   77  gphoto2 --summary
   78  gphoto2 --list-files
   79  gphoto2 --get-all-files
   83  gphoto2 --capture-image-and-download
   85  gphoto2 --get-file 2-3
   87  gphoto2 --get-file 4
   88  gphoto2 --get-all-files --skip-existing
   89  gphoto2 --capture-preview
   90  gphoto2 --delete-file 2
   93  gphoto2 --capture-image-and-download
   95  gphoto2 --capture-image-and-download
   97  gphoto2 --auto-detect
   98  gphoto2 -a
   99  gphoto2 --list-files
  101  gphoto2 ----upload-file 2
  102  gphoto2 ----upload-file 2 2
  103  gphoto2 --get-file 2
  112  gphoto2 --delete-file 2 3
  113  gphoto2 --skip-existing
  126  gphoto2 --get-file --skip-existing
  128  gphoto2 --get-file 1 --skip-existing
  130  gphoto2 --get-all-files --skip-existing
  132  gphoto2 --get-all-files --new

​
0 Comments

    Author

    Just a blog about what we and the kids are up to. Also some projects that I may be doing.

    Archives

    July 2018
    June 2018
    May 2018
    October 2017
    January 2017
    November 2016
    September 2016
    August 2016
    July 2016
    June 2016
    April 2016
    September 2015
    August 2015

    Categories

    All
    Antenna
    Back Yard
    Flooring
    Hardware
    Kids
    RV Project
    Software
    Woodwork

    RSS Feed

Powered by Create your own unique website with customizable templates.