A man can never have too many projects.

|
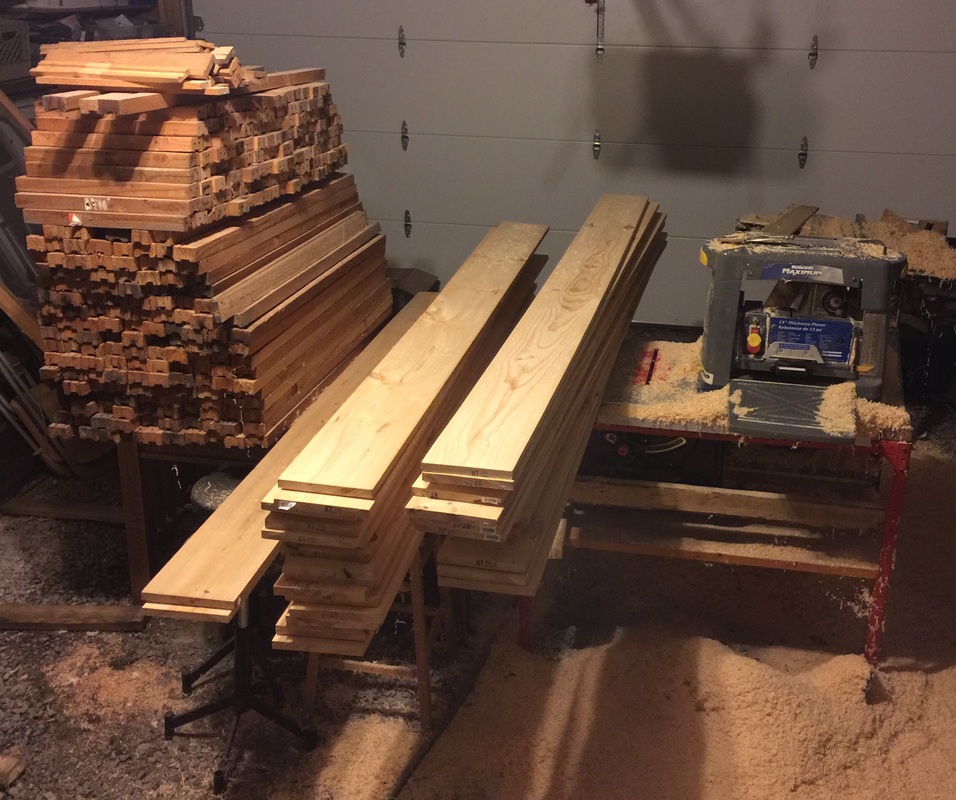
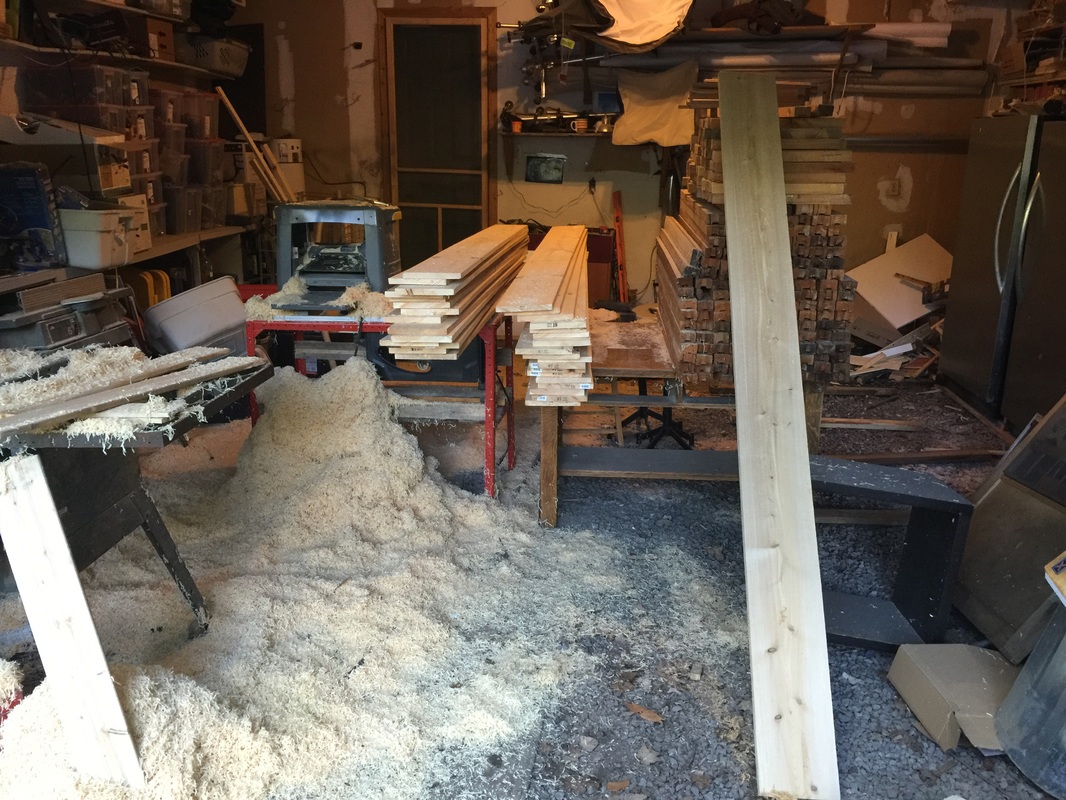
I currently have wood floors in all rooms but two. I used some spare time today to start the pine floor in the kids room. Really this is step 3. Step one was buying (cheap from Home Depot - about $1/sq ft). Step 2 was acclimatizing for 6 months. Step three is now planing. I bought approximately 170 sq ft of rough pine in 1x8x8', I have a 13" mastercraft planer from my brother-in-law. Not the best but it works. I used the planer to plane it down to 3/4" (0.756" actually). Took about 6 straight hours of work, as each pass took off only 1/32". Looks good and ready for the next steps: Jointing, Ripping, Tongue & Groove and finally the easy bit - installation. In the bottom picture below, the stacked wood right of the newly planed pine is the reclaimed/pallet douglas fir which will be the last bit of the puzzle and used in the master bedroom and kitchen floor.
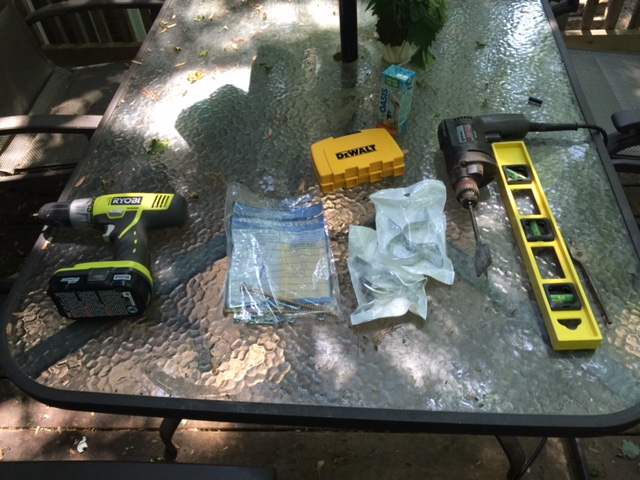
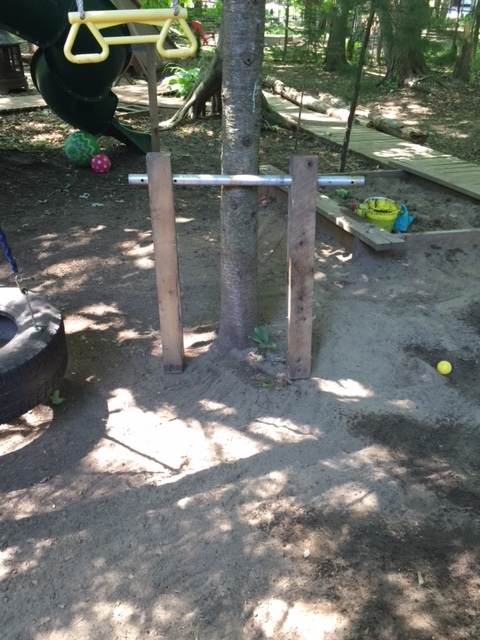
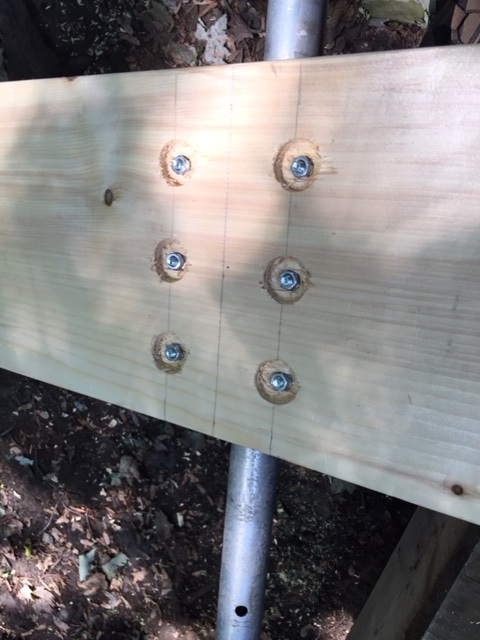
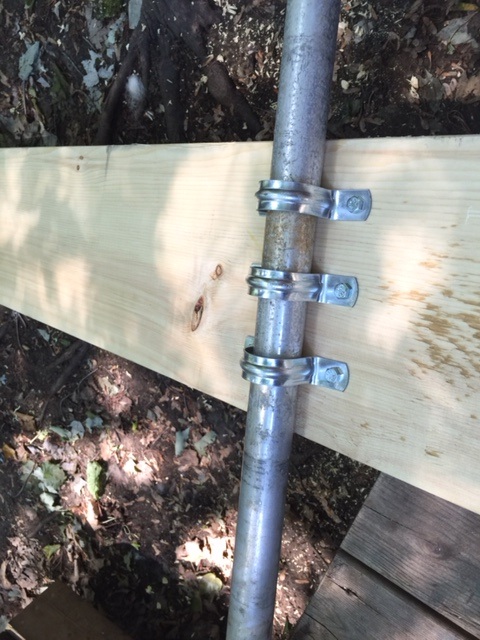
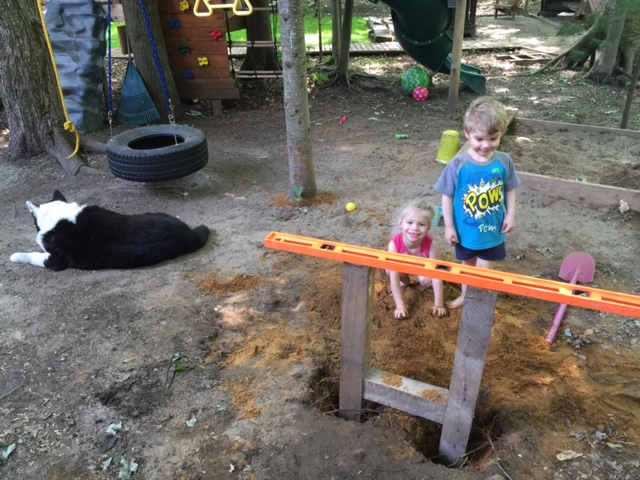
 Decided to make a simple but solid seesaw for the kids. First I moved the kids sand box to create a suitable space for the seesaw (at least 10x4ft in area). I then built a simple frame using 4x4's and my spare pipe. Cross beam is 12". Frame height was about 35". I cut the pipe in the end to be about 24". Next trick was to attach the pipe clamps to the seat board. I needed more strength than just wood screws so I used short bolts. 1/4 bolts fit the clamps and were very secure. I probably could have got away with just two clamps. I drilled an insert so that the munchkins would not be walking on or bumping into exposed nuts. I dug holes about 12" in depth to place the frame. I aimed for the pipe to be approximately 22" off the ground. Once level all around I then used quick set post cement to lock it in place. I tried to keep the kids off for at least 20 minutes. I then drilled holes through the pipe on each side of each frame to place the locking clips (4 in total). A side benefit is that the seat board can be removed easily at any time for repair or events. You can also drill lower holes in the frame assembly for even smaller kids. My two just turned 4. Overall the seesaw turned out a lot more solid than I expected. I used parts I had kicking around:
Parts I bought ($32 worth at Lowes this time)
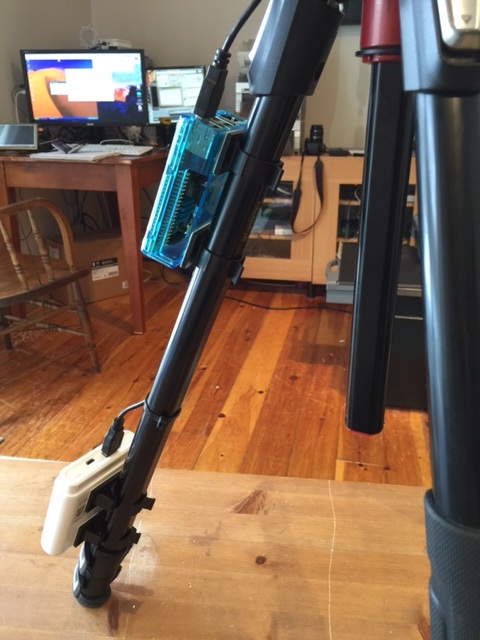
I found a cheap bg-e8 battery grip to try to mount the raspberry inside the grip. However it will NOT fit. In addition, the grip is good for the t3i, t4i, t5i but not the t6i. Currently I have only t3s, t4s, t5s and a t6i. Great. I may try again with a bg-e10 (t3, t4, t5) or even a bg-18 (for the t6i) , if I can find a cheap or broken one. Really all I need is a grip that will mount and which is large enough to enclose the raspberry. However ideally I would like to use it as a grip if it is too small for the pi 3. The whole setup was only about $80 can. $50 for the pi3 (Active), $10 for the 32gb micro sd (canadacomputers) and $20 for the touch screen and case (free delivery from china in 2 wks).
In some event photography events the camera is required more than 3m from a mac. 3m is the maximum allowed by USB, so I sometimes use USB extenders. In my last Les Promenades Gatineau job, I required 4 USB extenders. It worked, but it may have also damaged the circuitry of two cameras, so I needed another solution. Wifi adapters for the rebel series are not available or ridiculously expensive. The built-in wifi on the T6 is useless for tethering to a server/computer. The other obvious solution is using a eyefi card. I have had this solution in my back pocket for years and revisit it occasionally, but every time I find the uploads to be much too slow. My delivery system requires it to be on the server quickly so my Mac app can format everything and make it available for the iPad app (for customer presentation) as soon as possible. I'll try to avoid a long winded explanation, to make a long story short: get latest raspbian, and install or turn on: gphoto2,samba,vlc,vnc,afp. gphoto2 is a UNIX app that works on almost all SLRs. To install gphoto2 download and run this script: https://github.com/gonzalo/gphoto2-updater/ using gphoto2: http://www.gphoto.org/doc/manual/using-gphoto2.html Installing afp and vnc from this great page: http://dennistt.net/2013/09/15/raspberry-pi/ I originally wrote a perl script using gphoto2 to look and grab the new pictures every second until I saw that gphoto2 has a one line command to set the camera to automatically upload new pictures as they are taken! gphoto2 --capture-tethered Write the following script: CapturePhoto.sh #!/bin/bash cd /home/pi/Pictures/Captured gphoto2 --set-config iso=200 gphoto2 --set-config aperture=9 gphoto2 --set-config shutterspeed=1/125 gphoto2 --capture-tethered --filename IMG_%H%M%S-%01n.%C Or you can also do it without the hook and the setting of camera presets #!/bin/bash cd /home/pi/Pictures/Captured gphoto2 --capture-tethered --filename IMG_%H%M%S-%01n.%C There may be times when the script may request a override of the image because the camera has been turned on & off and a similar named file exists in your folder, so setting the image name based on the time is useful. A sequence number is also required if more than one image is taken within a second. A excellent page showing other things you can do including some hook software by changing this line: gphoto2 --capture-tethered --hook-script=/home/pi/Pictures/hook.sh --filename IMG_%H%M%S.%C http://www.giric.com/2013/03/tethered-shooting-with-gphoto2/ The capture tethered command will actually put the rebels in a mode where any picture taken will automatically upload it to the raspberry (on /home/pi/Pictures/Captured). My Mac app I previously wrote then takes it off the raspberry server wirelessly (and deletes it on the raspberry) and prepares it for my iPad selection app and the printer. I could mount the mac server and deposit the picture there however experience tells me it is better to deposit it locally and have my program grab it. When the camera is turned off the script automatically closes.so you will need to restart the script or raspberry (if in autostart) every battery change. Remember there is a free Mac and Windows app from canon to tether and capture pictures but you can't strap a PC to the back of a camera! My biggest issue was creating a desktop shell script which would open a terminal and run all the ghoto2 shell commands and then keep the terminal open. lxterminal is a bit weird about that. Write this script for desktop/launch LaunchMe.sh #!/bin/bash lxterminal -l -e 'echo PhotoCapture ; /home/pi/Pictures/PhotoCapture.sh ' It automatically closes the script when you turn off the camera. Remember that you need to turn on the camera before you start your script (or raspberry if you have the script autostart). In the pictures below I added it to the start menu, in addition to the desktop. 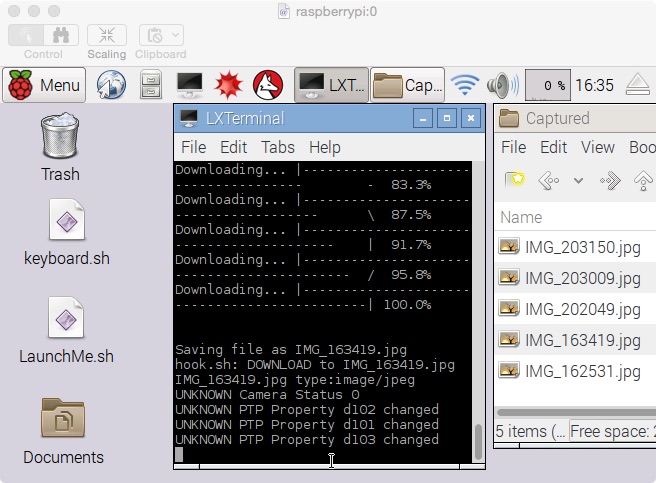 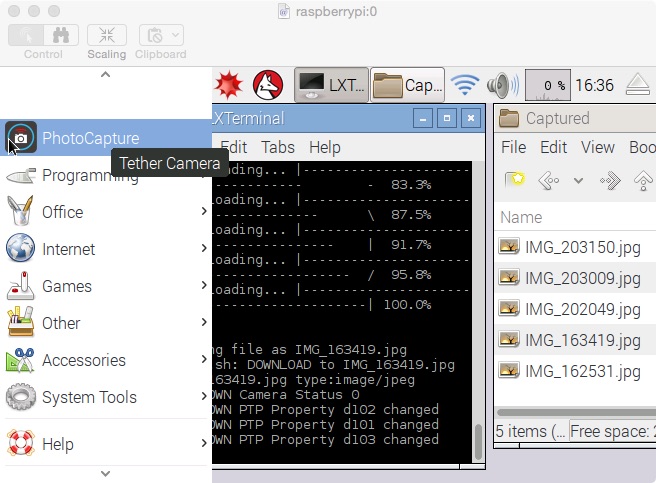 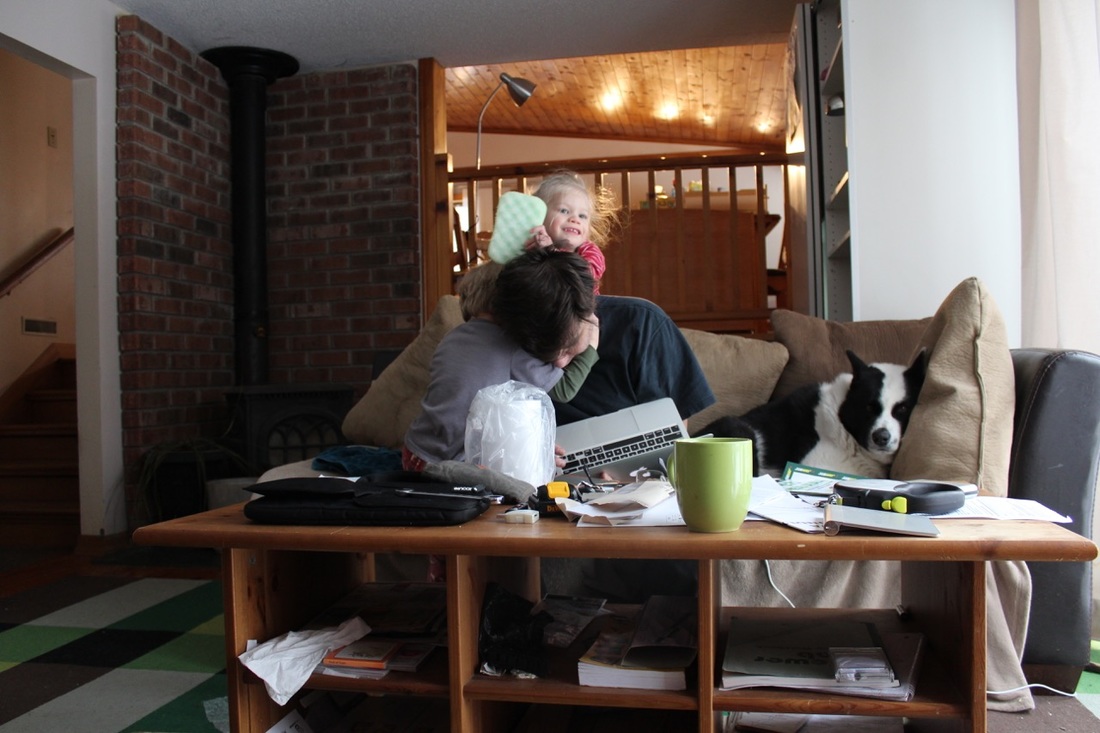 So I now have a wifi canon rebel adapter using the raspberry. I took this picture remotely which was automatically sent from the canon T5 (also works on my T3 &T6i) to the raspberry then wirelessly to a Mac. Programming with two kids jumping on you is not easy! The tethered speed is so much faster the eyefi card and seems to be as quick as the mac canon camera utilities for hardwired USB setups.
Command SummaryStart with raspbian image
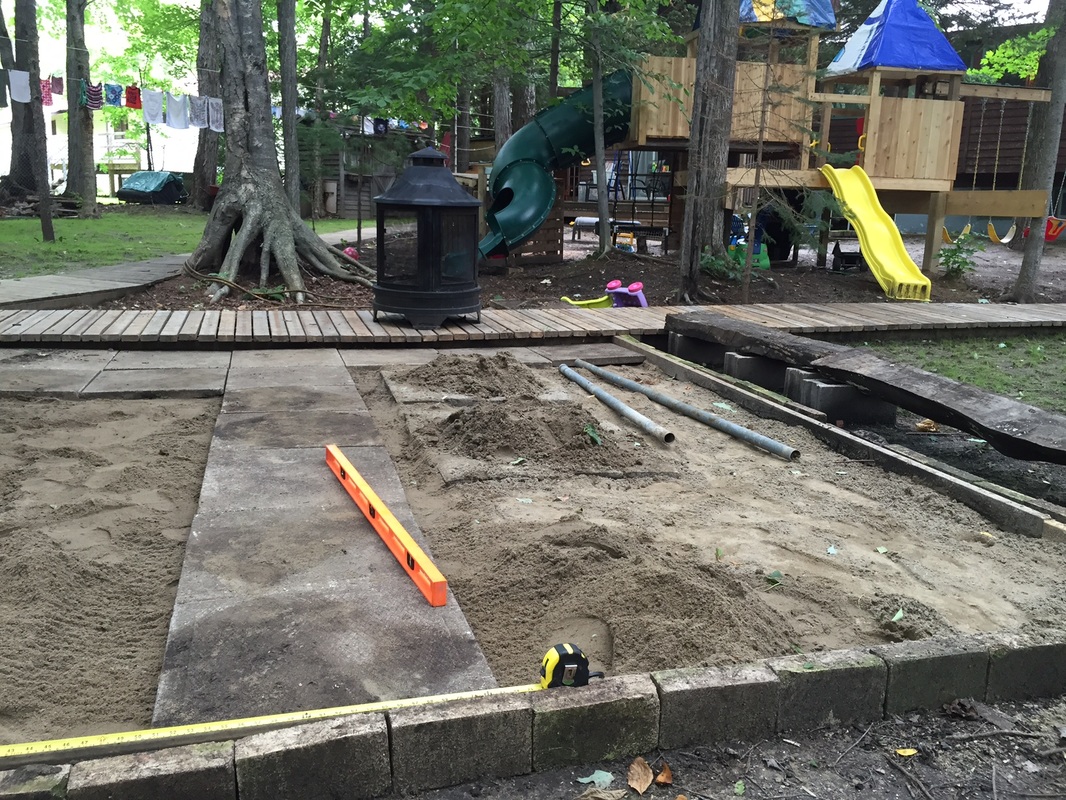
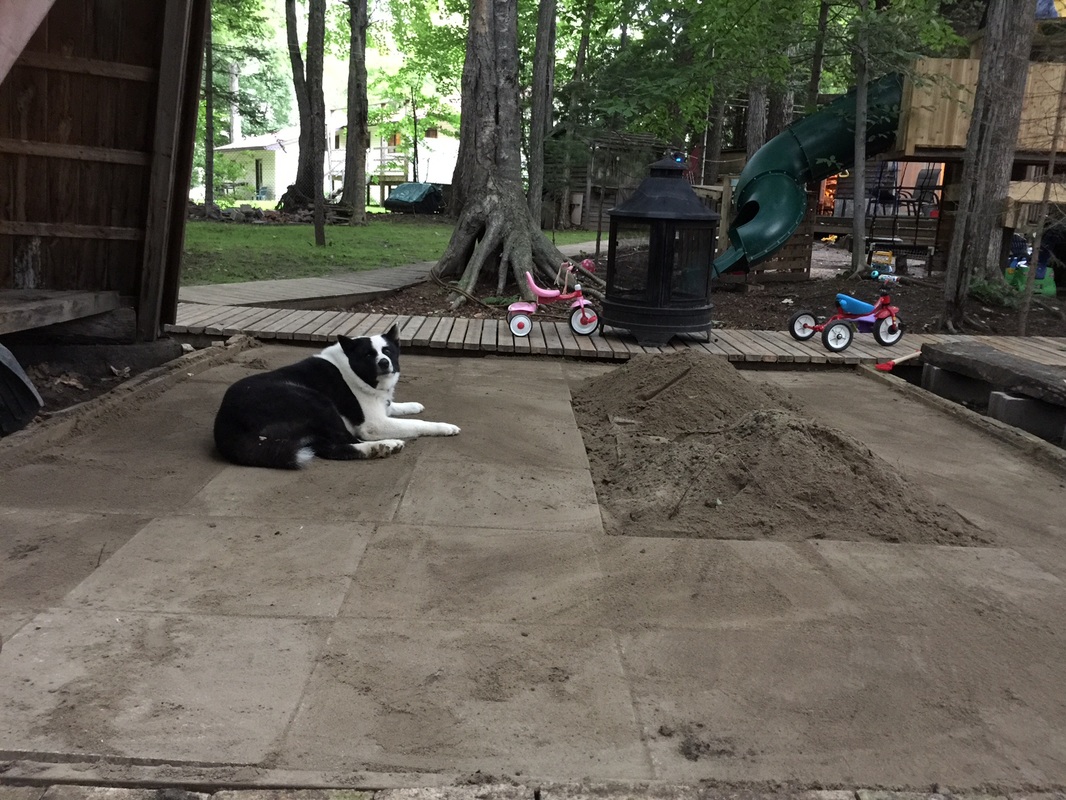
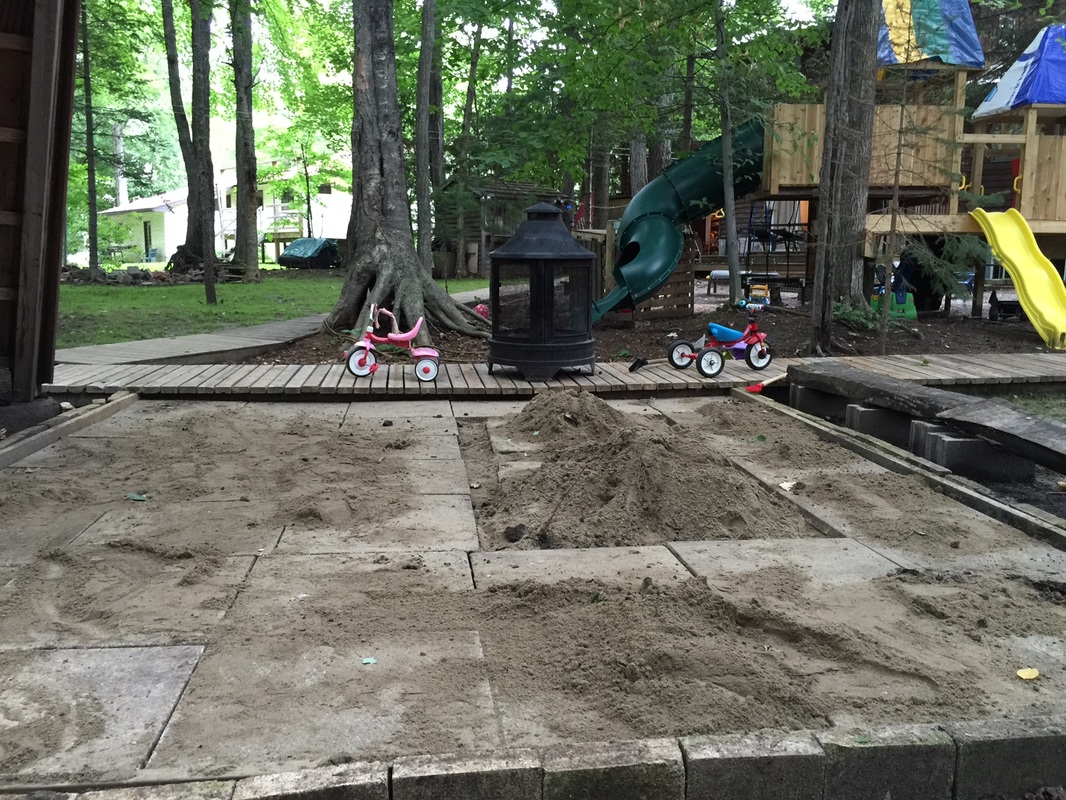
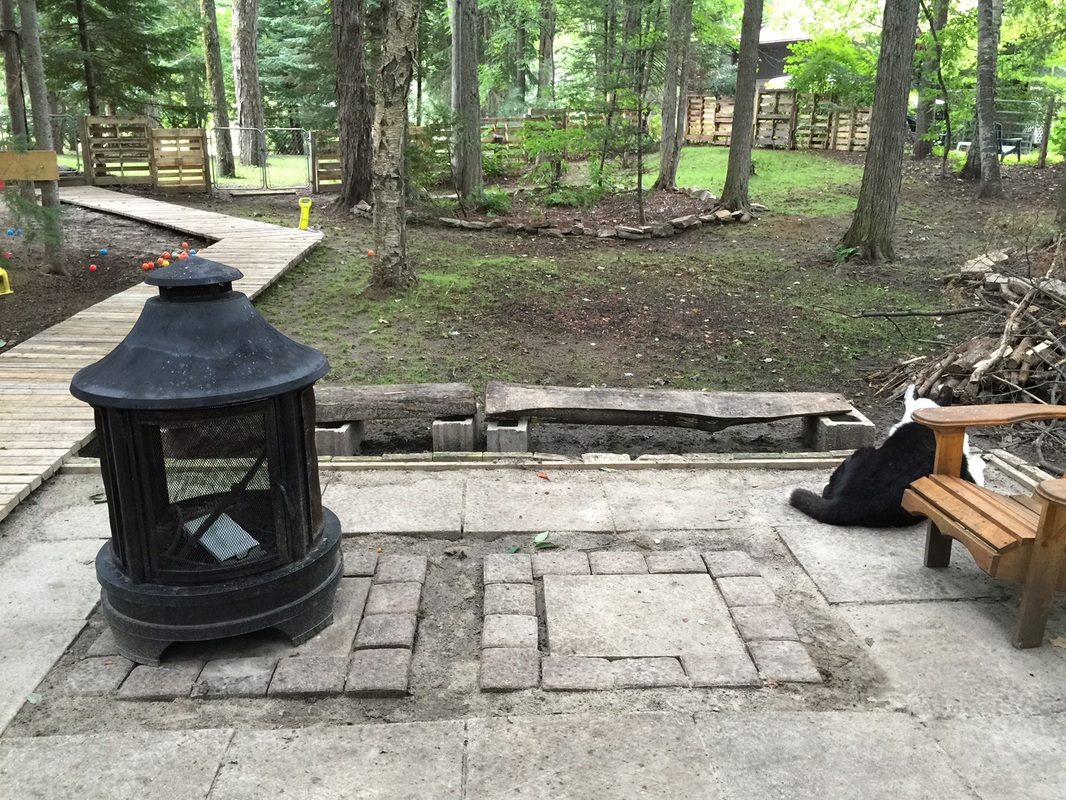
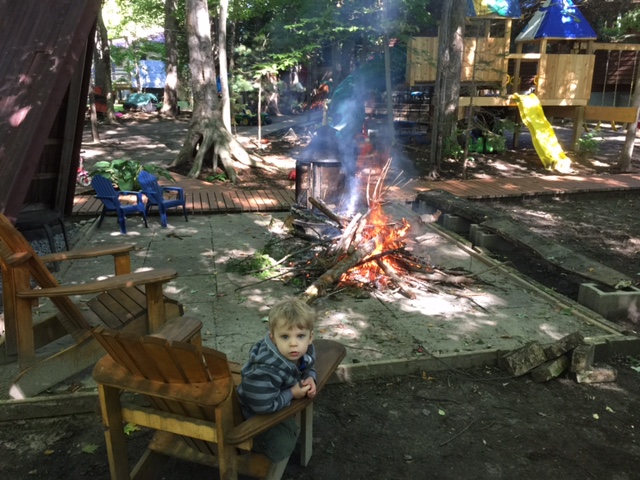
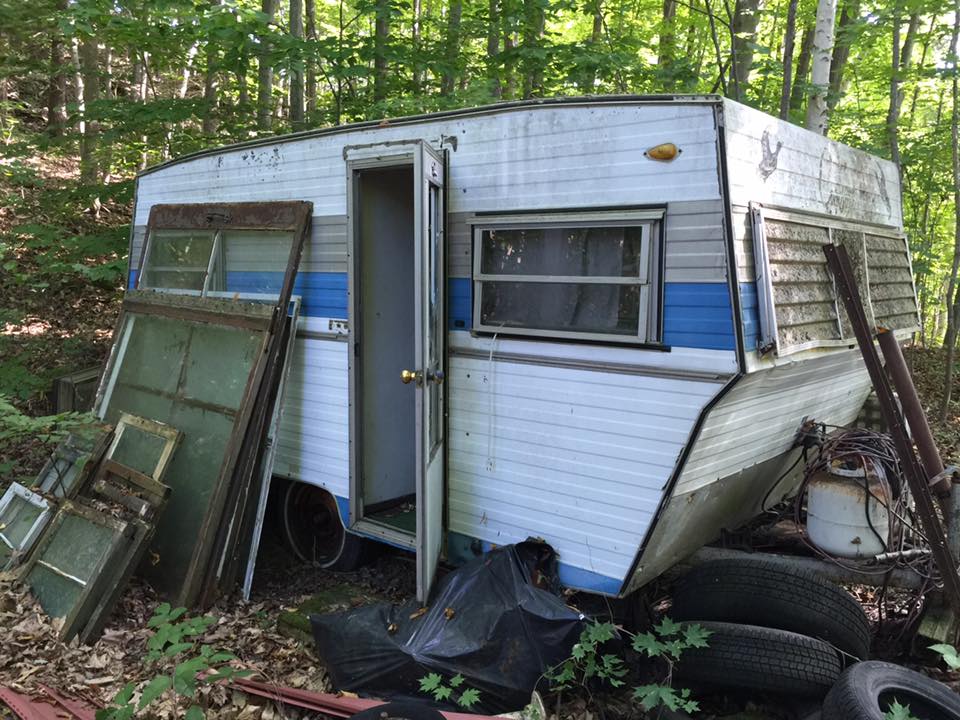
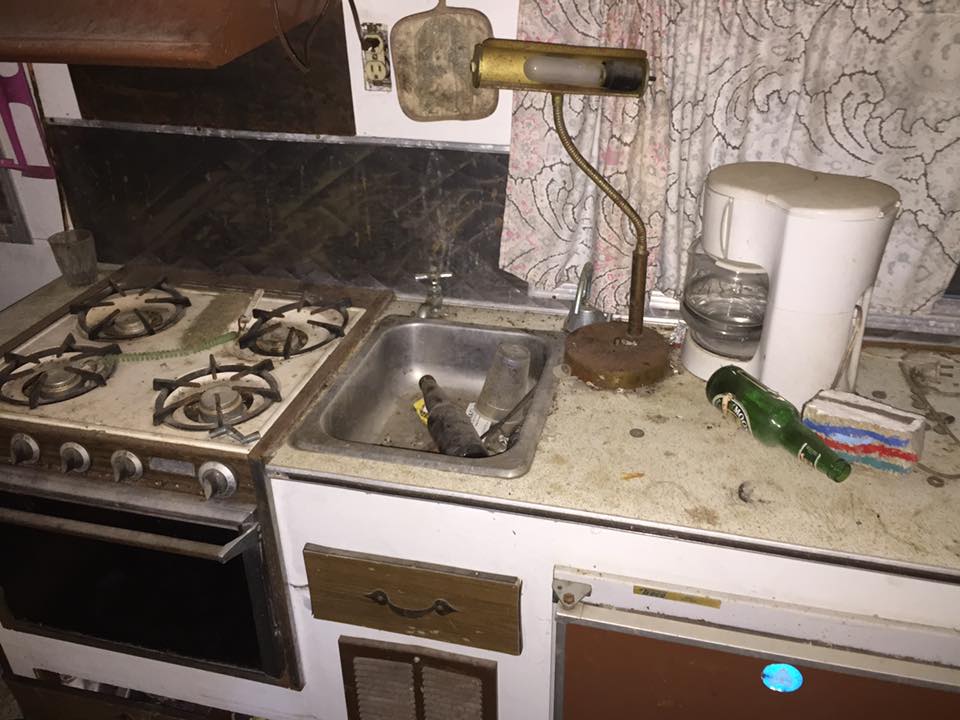
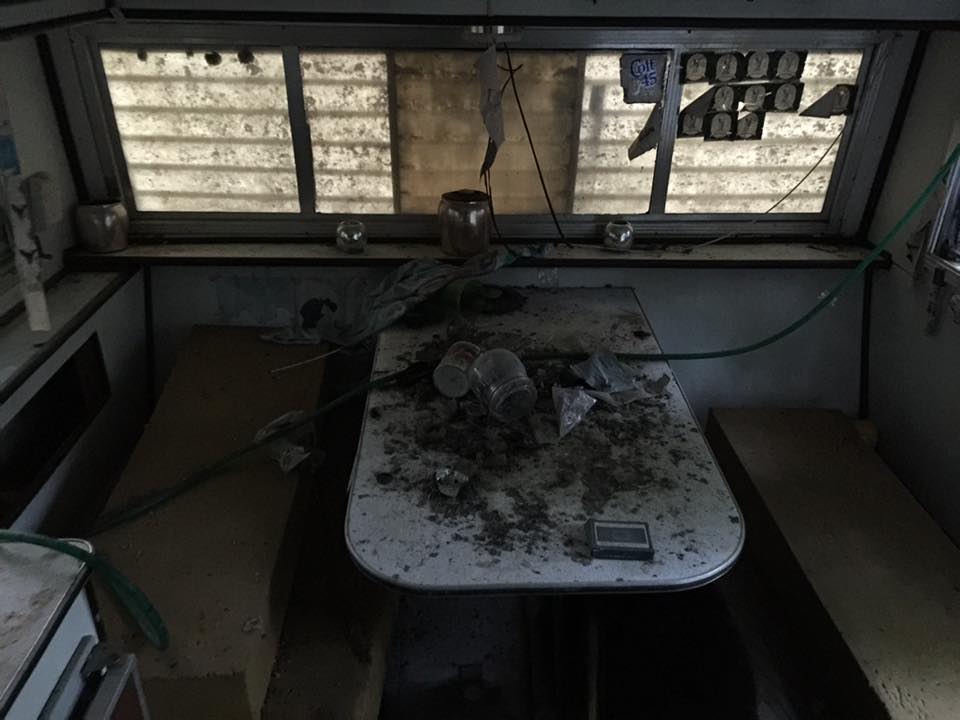
Write to sd card with win32imager program (mac on available also but i used windows 10 on parallels) Expand your file size. Reboot. Set up localisation in configuration - keyboard, time zone etc. I found this to be very buggy affecting startup or wifi. It seems changes to the config file has some know bugs, so I just only change the keyboard and the time zone. Weird things were happening otherwise. Reboot Connect to your wifi or ethernet. Install gphoto2 $ wget https://raw.githubusercontent.com/gonzalo/gphoto2-updater/master/gphoto2-updater.sh && chmod +x gphoto2-updater.sh && sudo ./gphoto2-updater.sh $ sudo apt-get install libpopt-dev -y $ sudo apt-get install libltdl-dev -y $ sudo apt-get install libusb-dev -y $ sudo apt-get install libusb-1.0-0-dev -y $ cd libgphoto2-2.5.10 $ ./configure –prefix=/usr $ ./configure $ make $ history $ sudo make install $ cd tar zvxf gphoto2-2.5.5.tar.gz $ tar zvxf gphoto2-2.5.5.tar.gz $ ./configure –prefix=/usr $ ./configure $ make $ sudo make install set up vnc & AFP $ sudo apt-get install netatalk x11vnc $ sudo apt-get update $ x11vnc -storepasswd $ sudo mkdir ~/.config/autostart $ sudo nano ~/.config/autostart/x11vnc.desktop -------- [Desktop Entry] Encoding=UTF-8 Type=Application Name=X11VNC Comment= Exec=x11vnc -forever -usepw -display :0 - ultrafilexfer StartupNotify=false Terminal=false Hidden=false ---------- sudo nano /etc/avahi/services/rfb.service ---------- <?xml version="1.0" standalone='no'?> <!DOCTYPE service-group SYSTEM "avahi-service.dtd"> <service-group> <name replace-wildcards="yes">%h</name> <service> <type>_rfb._tcp</type> <port>5900</port> </service> </service-group> ----------- restart sevice sudo /etc/init.d/avahi-daemon restart reboot Some Gphoto2 commands 74 gphoto2 --capture-image-and-download 75 gphoto2 --list-ports 76 gphoto2 --auto-detect 77 gphoto2 --summary 78 gphoto2 --list-files 79 gphoto2 --get-all-files 83 gphoto2 --capture-image-and-download 85 gphoto2 --get-file 2-3 87 gphoto2 --get-file 4 88 gphoto2 --get-all-files --skip-existing 89 gphoto2 --capture-preview 90 gphoto2 --delete-file 2 93 gphoto2 --capture-image-and-download 95 gphoto2 --capture-image-and-download 97 gphoto2 --auto-detect 98 gphoto2 -a 99 gphoto2 --list-files 101 gphoto2 ----upload-file 2 102 gphoto2 ----upload-file 2 2 103 gphoto2 --get-file 2 112 gphoto2 --delete-file 2 3 113 gphoto2 --skip-existing 126 gphoto2 --get-file --skip-existing 128 gphoto2 --get-file 1 --skip-existing 130 gphoto2 --get-all-files --skip-existing 132 gphoto2 --get-all-files --new I moved the patio stones from under the pergola to the back to be used as a patio for the fireplace and Laavu. A laavu is a Finnish wood shelter often used by campers/hunters/hikers/fishermen etc. throughout Finland. Mine needed a more pronounced area. I am happy with the results. I used a cub yard of sand and lots of elbow grease. The pad is constructed to comfortably fit a couple of Algonquin chairs and lava, in addition to the fireplace. The second pad is for occasional brush burning. My next project for the kids. It was sitting on my sisters back lot for 21 years. We put on new wheels & brake/signals and drove it 150km to Ottawa. I plan to gut it totally before October and build it up in the new year after my Christmas contracts. And I am not crazy..... BlogWell yet another version of my personal blog. This time I will try a weekly version. Generally it will contain the same and slightly more than things posted on our Facebook page.
|
AuthorJust a blog about what we and the kids are up to. Also some projects that I may be doing. Archives
July 2018
Categories
All
|


 RSS Feed
